Big Ben, love it or hate it and lots of you out there seem to hate it, is actually one of my favourite dungeons, so I thought I'd give it its own dedicated talk through blog post. Big Ben is the dungeon with a little bit of everything, puzzles, secret bosses and lots, oh yes, lots of unavoidable fights. It's the final dungeon in Marleybone, where you get to face Meowiarty, an ugly looking cat whose been helping Malistaire wreak havoc. Located in the Royal Museum the dungeon is a tower with fifteen floors, though a few little tricks can be used to make things a little easier.
 | |
| The Entrance. |
- The first floor is occupied by Travis Pawman and two O'leary Connivers ( Balance ), you need to speak to Travis to progress through the dungeon, the fight with the O'leary Connivers is unavoidable, there is no sneaking around them, ( Unless you are doing the dungeon with a friend and you let them enter the fight, you will then be able to go around the fight to speak to Travis, you can do this with all of the fights in the dungeon )
- Floor two is occupied by a Streetsweeper ( myth ) and an O'leary conniver ( balance )
- Floor three, no fight here there are two red wisps in the room. Travis Pawman is back in the room and basically informs you that you are on your own for the rest of the dungeon. Like he had helped anyway! Jack Thistleberry, another NPC is also in the room he will give you a quest to open chests that are located throughout the dungeon. Although the dungeon Big Ben is repeatable, once opened these chests cannot be opened again.
- Floor 4 is occupied by a Filcher ( Ice ) and a Kettlehead ( Balance )
- Floor 5 is occupied by a Filcher ( Ice ) and and O'Leary Rowdy ( Ice )
- Floor 6 is occupied by a Gearhead ( Storm ) and a Kettlehead ( Balance ) , In this room is the first of three milk bottles spread throughout the dungeon, if you would like to fight an additional boss later in the game, knock this over.
 |
| Notice the shield on the way out! Don't forget to spill the milk. |
- Floor 7 is occupied by an O'Leary Rowdy ( Ice ) and two Brown Recluse spiders ( Life ). This room also contains four wooden chests, you can open one of these if you have Jack Thistleberrys quest. Two red wisps can also be found on this floor, you will not be able to reach them until after the fight.
- Floor 8 is a puzzle room, on floors 4, 5, 6 and 7 when you leave the floor a shield close to the exit has a glowing gold symbol, make a note of these symbols and just stand on the corresponding floor tile. You can go back into the rooms to check back for these. Or you could just let me give you the code its snowflake, bird, weird looking dog thing, and moon. After lighting up the floor tiles by standing on them you need to pull the lever which opens up the rest of the dungeon. It does not matter in what order you light up the floor tiles.
 |
| Lighting up the tiles and pulling the lever. |
- Floor 9 has a Filcher ( Ice ) and a Nightmare Spirit ( Death )
- Floor 10 has a Kettlehead ( Balance ) and a Nightmare Spirit ( Death ). The second milk bottle is in this room.
- Floor 11 has two nightmare spirits ( Death ) and a potbelly ( Storm ). If you have the quest you can open one silver chest in this room.
 |
| The end is now in sight, no fight in the next room. |
- Floor 12 good news you can find some much needed red and blue wisps in this room. This room has a nice little trick too, fill up on some of the wisps making sure to leave some still floating. Now wait a few minutes, check your deck or something, just don't leave the room. The wisps will then all regenerate to the initial number when you entered the room. You can also return to this room to pick up any wisps left remaining after you leave, which can prove a handy energy source. A stray cat can also be found in this room, it is behind some tall crates on the left when you enter the room.
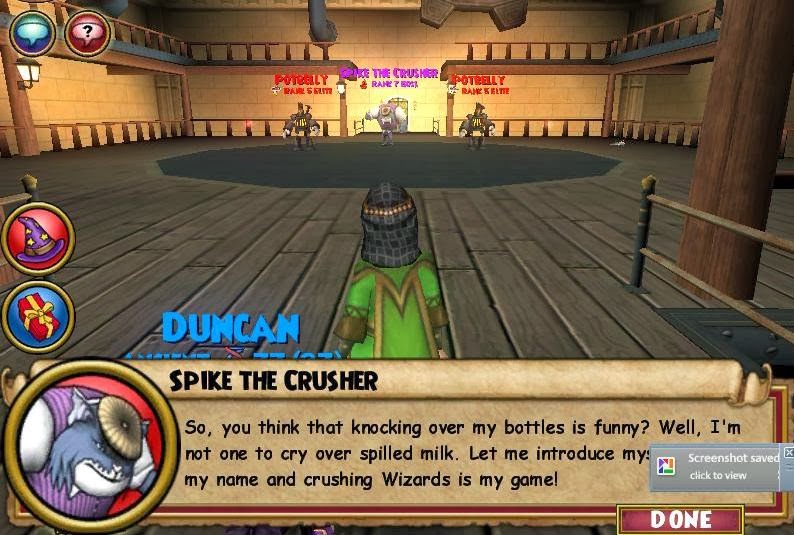
- Floor 13 has a potbelly ( Storm ) and a shield skeleton ( Death ). The last milk bottle is in this room, if have knocked all the milk bottles over you will get to fight the optional boss Spike the Crusher in the next room. Spike has two potbellys in the room with him, you can leave the milk bottle standing go into the next room and fight the potbellys. Go back into the previous room and knock the milk bottle over to face Spike on his own!
- Floor 14 Spike the Crusher, optional boss ( Fire ) and two potbellys ( Storm ). There are two red wisps in this room.
 |
| Your going down Spike |
- Floor 15 Yay you have done it, your nearly at the end just Meowiarty ( Myth ) and his pals to go, Agony Wraith ( Death ) and a Clockwork wizard ( Life ). The gold chests are also located in this room, one of which you can open if you have the quest. The book from the quest reading into the past is also in this room.
 |
| Meowiartys about to leave his pals to face the music alone! |
Throughout the dungeon you will find plenty of scrap iron and mistwood, the creatures also seem to drop alot more furniture than usual. Newspaper pages, blue balls of yarn, crossbone gravestones, tin cans, short metal fences, altars with candles, angled gravestones and steins can all be picked up from the street enemies in this dungeon.
You will probably need some potion bottles to complete the dungeon, as running low on manna can become a real problem. As the dungeons so long I would recommend going in with friends, as it just helps move the game along a little faster. Most of all enjoy it and don't forget to collect the Stray cat and the book at the end.
No comments:
Post a Comment